Frame-by-frame animation using SVG and SMIL
— Written by Jonathan Ingram
The issue of the SVG Comic Bifter contains some SMIL animation commands inside the SVG file.
If you view the comic via Chrome or Safari you’ll notice a frame-by-frame animation of a Mortal Kombat combatant.
If however, you’re using an alternative browser instead, then you’re missing out on this…
I’m now going to show you how this was achieved.
In this quick example we’ll be creating a three frame animation that will loop indefinitely. The following three shapes will be hidden and revealed at specific points in our timeline.
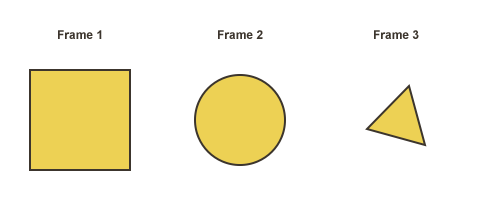
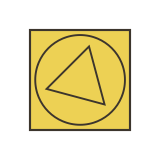
If we were to construct our SVG file without any animations, then each shape would stack on top of one another.
<svg xmlns="http://www.w3.org/2000/svg" width="160" height="160">
 <g>
  <rect
    style="fill:#edd154;fill-opacity:1;stroke:#3c352d;stroke-width:2;stroke-opacity:1;"
    id="square"
    width="100"
    height="100"
    x="30"
    y="30" />
  <path
    style="fill:#edd154;fill-opacity:1;stroke:#3c352d;stroke-width:2;stroke-opacity:1;"
    id="circle"
    d="m 125,80 a 45,45 0 1 1 -90,0 45,45 0 1 1 90,0 z" />
  <path
    style="fill:#edd154;fill-opacity:1;stroke:#3c352d;stroke-width:2;stroke-opacity:1;"
    id="triangle"
    d="M 105,105 47,89 89,46 105,105 z" />
 </g>
</svg>
To achieve the frame-by-frame animation we use the <animate> element, which can animate a single attribute or property over time. For our example it needs to be placed inside each one of our shapes.
<svg xmlns="http://www.w3.org/2000/svg" width="160" height="160">
 <g>
  <rect
    style="fill:#edd154;fill-opacity:1;stroke:#3c352d;stroke-width:2;stroke-opacity:1;"
    id="square"
    width="100"
    height="100"
    x="30"
    y="30">
    <animate
      id="frame1"
      attributeName="display"
      values="inline;none;none;none"
      keyTimes="0;0.33;0.66;1"
      dur="1s"
      begin="0s"
      repeatCount="indefinite" />
  </rect>
  <path
    style="fill:#edd154;fill-opacity:1;stroke:#3c352d;stroke-width:2;stroke-opacity:1;"
    id="circle"
    d="m 125,80 a 45,45 0 1 1 -90,0 45,45 0 1 1 90,0 z">
    <animate
      id="frame2"
      attributeName="display"
      values="none;inline;none;none"
      keyTimes="0;0.33;0.66;1"
      dur="1s"
      begin="0s"
      repeatCount="indefinite" />
  </path>
  <path
    style="fill:#edd154;fill-opacity:1;stroke:#3c352d;stroke-width:2;stroke-opacity:1;"
    id="triangle"
    d="M 105,105 47,89 89,46 105,105 z">
    <animate
      id="frame3"
      attributeName="display"
      values="none;none;inline;none"
      keyTimes="0;0.33;0.66;1"
      dur="1s"
      begin="0s"
      repeatCount="indefinite" />
  </path>
 </g>
</svg>
The <animate> element comes equipped with various attributes (which you can read more about in the SVG spec) but for our example we’re going to concentrate on just the following…
attributeName="display"Our example requires us to hide and reveal each shape when necessary. To do this we need to instruct it to alter each shape’s respective
displayproperty.values="inline;none;none;none"These are specific values related to the
displayproperty. In this instance we’re asking it to show the square at the beginning and then hide it again for the remainder of the animation. In contrast our circle (which has a value ofnone;inline;none;none) will be hidden during the first frame, before appearing for frame two, only to disappear again for the remainder of the animation.Apart from the
idattribute this is the only setting in our example that needs to differ for each shape.keyTimes="0;0.33;0.66;1"This is a list of time values, which is used to control the pacing of the animation. I’ve split the values into intervals of 0.33 because I want a consistent time delay for each frame. Each time in the list corresponds to a value in the
valuesattribute list, and defines when the value should be used in the animation. There must be exactly as many values in thekeyTimeslist as in thevalueslist. Each time value must be specified as a floating point between 0 and 1 (inclusive).In our example we need to state four values (even though we only have three frames of animation) because we want it to loop indefinitely (and thus any display value attributed to the
keyTimesvalue of 1 would be ignored by thekeyTimesvalue of 0 for the proceeding animation loop).In effect the fourth value inside the
valuesattribute is redundant, and thus all three shapes have it set tonone.dur="1s"Here we can state how long our animation will last before looping.
begin="0s"This sets the start time of our animation.
repeatCount="indefinite"States how many animation loops we require. This can be replaced with a number for a more specific loop count.
Below is our finished animation.
It’s worth noting that I could have gone about this process in other ways, as there are many more attributes available for the <animate> element that I haven’t touched on yet. So if you’re interested in some further reading then I recommend going through the SVG spec.