Creating three-dimensional drawings in SVG for 3D glasses
— Written by Jonathan Ingram
After reading about the techniques used to produce three-dimensional comic books during the 1950s [1] I was inspired to try this using SVG.
saw the release of the latest issue of the SVG Comic Bifter, which contained a 3D image on the final panel. I’m going to show you how this was done.
We need to create an anaglyph image that, when viewed with filter glasses, produces a three dimensional scene. To simulate this effect in bitmap format we would need to create binocular vision. This process would involve taking two photos of our subject that are laterally separated by a short distance.
We would then load both the photos into a photo-editing software that allows for independent manipulation of the red, blue and green colour channels.
Sadly SVG doesn’t provide us with this luxury (unless we decide to use filters [2]) so instead we have to simulate the effect ourselves.
Whilst playing around with Inkscape I’ve found it’s possible to create both greyscale and colour anaglyph images but the effect is much more noticeable in greyscale.
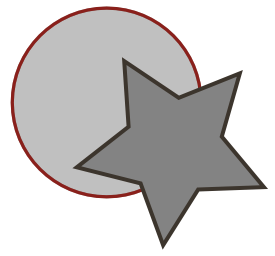
Below is our test subject. Throughout this tutorial I’ll try to provide both visual and coding examples in case you’d like to use a program like Inkscape or prefer to do this by hand.
<svg xmlns="http://www.w3.org/2000/svg" width="200" height="200">
 <g>
  <path
    style="fill:#c0c0c0;fill-opacity:1;stroke:#3c352d;stroke-width:1.6;stroke-opacity:1;"
    id="circle"
    d="m 139,86 a 50,50 0 1 1 -100,0 50,50 0 1 1 100,0 z" />
  <path
    style="fill:#838383;fill-opacity:1;stroke:#3c352d;stroke-width:2;stroke-opacity:1;"
    id="star"
    d="m 168,133 -34,1 -18,29 -12,-32 -33,-8 27,-21 -2,-34 28,19 31,-13 -9,33 22,26 z" />
 </g>
</svg>

Naturally we want the star object to be in the foreground. To achieve this we do absolutely nothing to it.
For the circle object however, we need to apply some lateral movement to give the illusion that it’s in the background. If we were to add further objects in the background we would need to apply even more lateral movement.
First we need to duplicate the circle object in Inkscape (Edit > Copy) and paste it on top of itself (Edit > Paste In Place).
There are six colour combinations for pure anaglyphs but we’ll be using the most popular one, that being pure red and pure cyan (green plus blue).
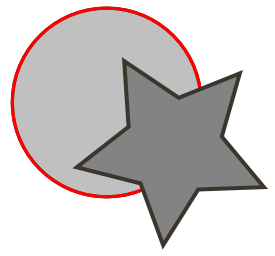
The new circle object that we’ve just pasted is going to have a red outline and will be seen by the user’s right eye. We need to completely remove its fill-opacity value (as this job will be done by the original circle object underneath it) and give it a red outline (#FF0000).
<svg xmlns="http://www.w3.org/2000/svg" width="200" height="200">
 <g>
  <path
    style="fill:#c0c0c0;fill-opacity:1;stroke:#3c352d;stroke-width:1.6;stroke-opacity:1;"
    id="circle"
    d="m 139,86 a 50,50 0 1 1 -100,0 50,50 0 1 1 100,0 z" />
  <path
    style="fill:#c0c0c0;fill-opacity:0;stroke:#ff0000;stroke-width:1.6;stroke-opacity:1;"
    id="circle-red"
    d="m 139,86 a 50,50 0 1 1 -100,0 50,50 0 1 1 100,0 z" />
  <path
    style="fill:#838383;fill-opacity:1;stroke:#3c352d;stroke-width:2;stroke-opacity:1;"
    id="star"
    d="m 168,133 -34,1 -18,29 -12,-32 -33,-8 27,-21 -2,-34 28,19 31,-13 -9,33 22,26 z" />
 </g>
</svg>
Now we need to tone it done with a stroke-opacity value of 0.4 (102 for Inkscape users).
<svg xmlns="http://www.w3.org/2000/svg" width="200" height="200">
 <g>
  <path
    style="fill:#c0c0c0;fill-opacity:1;stroke:#3c352d;stroke-width:1.6;stroke-opacity:1;"
    id="circle"
    d="m 139,86 a 50,50 0 1 1 -100,0 50,50 0 1 1 100,0 z" />
  <path
    style="fill:#c0c0c0;fill-opacity:0;stroke:#ff0000;stroke-width:1.6;stroke-opacity:0.4;"
    id="circle-red"
    d="m 139,86 a 50,50 0 1 1 -100,0 50,50 0 1 1 100,0 z" />
  <path
    style="fill:#838383;fill-opacity:1;stroke:#3c352d;stroke-width:2;stroke-opacity:1;"
    id="star"
    d="m 168,133 -34,1 -18,29 -12,-32 -33,-8 27,-21 -2,-34 28,19 31,-13 -9,33 22,26 z" />
 </g>
</svg>
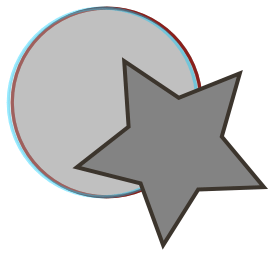
To take the left eye into account we need to duplicate our red outlined circle but this time we’re going to give it a cyan outline (#00CCFF) and a fill-opacity of 0.4 (102 for Inkscape users). We also need to give it a slight nudge to the left.
<svg xmlns="http://www.w3.org/2000/svg" width="200" height="200">
 <g>
  <path
    style="fill:#c0c0c0;fill-opacity:1;stroke:#3c352d;stroke-width:1.6;stroke-opacity:1;"
    id="circle"
    d="m 139,86 a 50,50 0 1 1 -100,0 50,50 0 1 1 100,0 z" />
  <path
    style="fill:#c0c0c0;fill-opacity:0;stroke:#ff0000;stroke-width:1.6;stroke-opacity:0.4;"
    id="circle-red"
    d="m 139,86 a 50,50 0 1 1 -100,0 50,50 0 1 1 100,0 z" />
  <path
    transform="translate(-2,0)"
    style="fill:#c0c0c0;fill-opacity:0.4;stroke:#00ccff;stroke-width:1.6;stroke-opacity:0.4;"
    id="circle-cyan"
    d="m 139,86 a 50,50 0 1 1 -100,0 50,50 0 1 1 100,0 z" />
  <path
    style="fill:#838383;fill-opacity:1;stroke:#3c352d;stroke-width:2;stroke-opacity:1;"
    id="star"
    d="m 168,133 -34,1 -18,29 -12,-32 -33,-8 27,-21 -2,-34 28,19 31,-13 -9,33 22,26 z" />
 </g>
</svg>
The reason why we’re using three circle objects in total (rather than just two) is because we need to replicate the effect that colour channels would give us if we were working with a bitmap. If we were using photo-editing software and we placed both the red and cyan (green plus blue) channels on top of each other it would give us the photo’s true colour. In SVG this isn’t possible, so instead we’ve had to cheat by placing To replicate this effect we place a third object underneath both the red and cyan outlines.
However, sometimes the darkness that shows up underneath might be too much, so you’ll have to play around with the stroke-opacity levels until it’s just right. For our example I’ve set the original circle’s stroke-opacity at 0.4 (102 for Inkscape users).
<svg xmlns="http://www.w3.org/2000/svg" width="200" height="200">
 <g>
  <path
    style="fill:#c0c0c0;fill-opacity:1;stroke:#3c352d;stroke-width:1.6;stroke-opacity:0.4;"
    id="circle"
    d="m 139,86 a 50,50 0 1 1 -100,0 50,50 0 1 1 100,0 z" />
  <path
    style="fill:#c0c0c0;fill-opacity:0;stroke:#ff0000;stroke-width:1.6;stroke-opacity:0.4;"
    id="circle-red"
    d="m 139,86 a 50,50 0 1 1 -100,0 50,50 0 1 1 100,0 z" />
  <path
    transform="translate(-2,0)"
    style="fill:#c0c0c0;fill-opacity:0.4;stroke:#00ccff;stroke-width:1.6;stroke-opacity:0.4;"
    id="circle-cyan"
    d="m 139,86 a 50,50 0 1 1 -100,0 50,50 0 1 1 100,0 z" />
  <path
    style="fill:#838383;fill-opacity:1;stroke:#3c352d;stroke-width:2;stroke-opacity:1;"
    id="star"
    d="m 168,133 -34,1 -18,29 -12,-32 -33,-8 27,-21 -2,-34 28,19 31,-13 -9,33 22,26 z" />
 </g>
</svg>
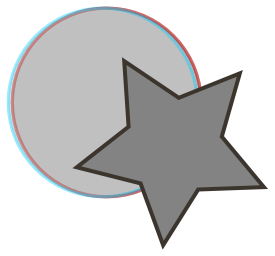
Our 3D effect is now complete. When viewed using 3D glasses you should see a noticeable separation between the star and the circle.
I won’t lie to you though, if you plan on drawing something much more detailed than this then expect an awful lot of trial and error. In fact I’d recommend using a proper photo-editing application SVG filters for much better results.
But if you do insist in using SVG, and you’re willing to spend the necessary time and effort, then a similar effect can be achieved.
Update: Thanks to Erik Dahlström for bringing up the option of using SVG filters.